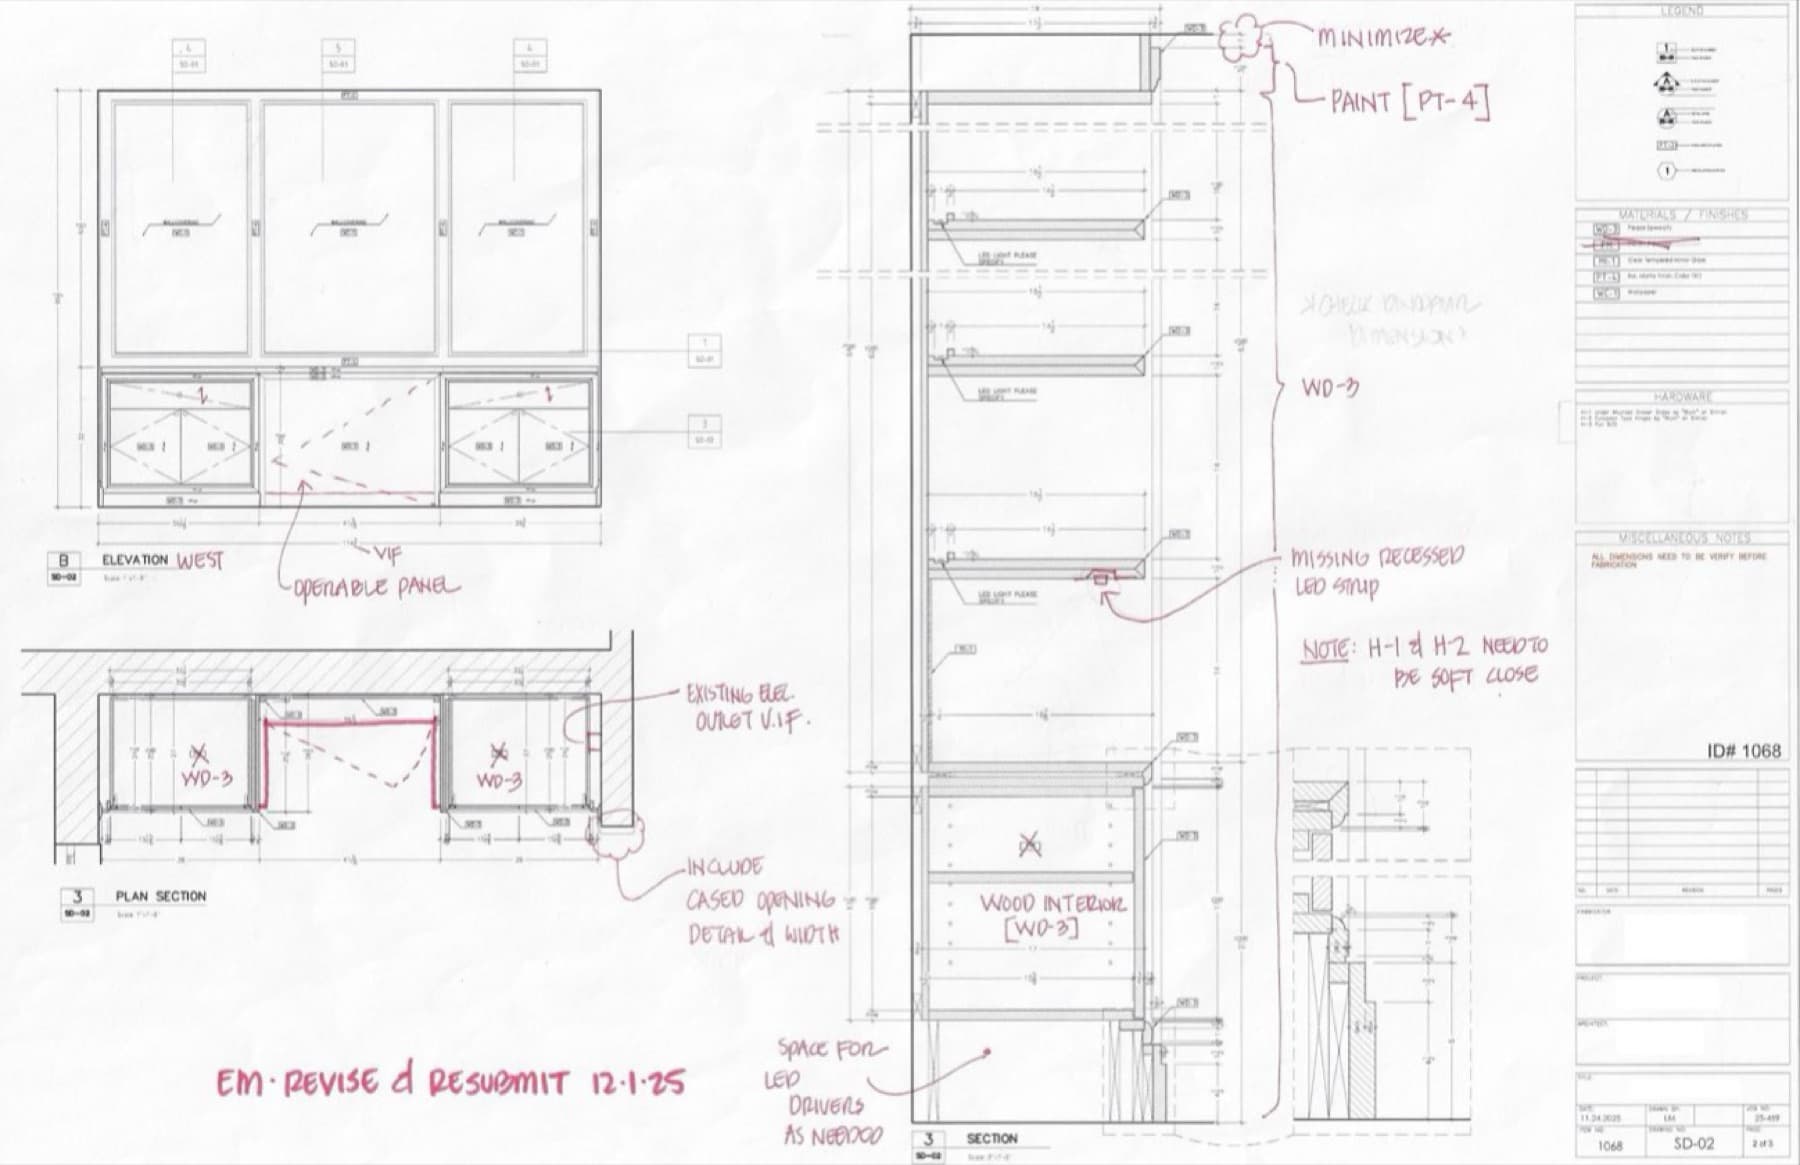
Shop drawing review is one of the highest-leverage hours of work on any millwork package. A well-redlined set catches problems on paper, where they cost minutes. A sloppy review pushes those same problems into the shop or onto the jobsite, where they cost weeks and thousands.
At 212 Renovations Group, we treat the redline as a deliverable, not a chore. Here's the process we run on every custom cabinetry, paneling, and built-in package — along with the checklist our project managers use before any drawing goes back to the fabricator.
A printable example of a marked-up shop drawing and the checklist is linked at the end of this post.
What "Redlining" Actually Means
Redlining is the markup pass on a fabricator's shop drawings where the GC and design team note required changes, ask questions, and confirm what is correct. The end goal is a stamped set that everyone — owner, designer, GC, fabricator, installer — has agreed represents what gets built.
The "red" part isn't decorative. Red ink, or a red layer in Bluebeam, Adobe Acrobat, or PDF Studio, is the universal convention for changes required.
Use it consistently, and use a different color for anything that isn't a binding correction. The fabricator should be able to skim a page and immediately see what is binding.
Pick a Color Convention Before You Mark a Single Line
There are two color systems in active use, and both work. The mistake is mixing them in the same package.
System A — Color by Comment Type. Best for packages where one reviewer marks the whole set.
- Red for change required, the fabricator must incorporate
- Green for question or RFI, response required
- Blue for information only, no action
System B — Color by Reviewer. Best for packages where two or three disciplines mark the set in series.
- Red for GC / project manager
- Blue for interior designer
- Green for the architect or engineer of record
- Orange for owner's rep
Under System B, the comment type is communicated by the verb — REVISE, CLARIFY, NOTE — not by the color. Whichever system you use, write it on the cover sheet of the redline set. The fabricator should not have to guess.
Before You Open the Drawings
Don't start redlining cold. Pull together the source-of-truth documents first: the latest architectural set with interior elevations and details, the interior designer's finish and hardware schedules, the signed millwork specification or scope letter, field measurements taken after substrate is in place (not measurements scaled off the architectural drawings), approved samples or precedent photos, and the previous redline set if this is a resubmittal.
If field dimensions don't exist yet, that's your first redline: every overall dimension should be flagged "Verify In Field" until you can confirm it against reality. Walls are never as plumb or as long as the architect drew them.
Treat "Verify in Field" as Default, Not Exception
V.I.F. — Verify In Field — should appear at every overall dimension, every existing-condition interface, every wall length, every ceiling height, every door swing, and every electrical or plumbing location the millwork has to coordinate with.
Don't reserve VIF for cases where you suspect a problem. Reserve the absence of VIF for dimensions you have personally measured. The default is that the field is wrong until proven right. The fabricator's job is to build off the field; your redline's job is to remind them.
The pattern we want to see on every sheet is a triangle or hexagon symbol with "VIF" inside, placed at every dimension that could vary in the field; the same notation on existing utilities ("EXISTING ELEC. OUTLET — V.I.F."); and a general note stating that all dimensions are VIF unless noted otherwise. You can't VIF too much. You can definitely VIF too little.
The Review, in Order
The trap with shop drawing review is going page by page. You'll catch dimensions and miss coordination. Instead, make several passes through the whole set, each focused on one thing.
Pass 1: Overall Dimensions and Field Conditions
- Compare overall L × W × H against your field measurements
- Confirm the drawing accounts for out-of-square walls, sloped floors, and ceiling variations
- Verify scribes are called out at every wall, floor, and ceiling junction
- Check clear floor space in front of doors and drawers
- Look at toe-kick heights against finished floor thickness. A 4" toe kick on the drawing turns into 3-1/4" once an unaccounted-for engineered floor goes down.
Pass 2: Materials and Finishes
- Wood species, cut, and grade match the spec (rift-sawn white oak is not plain-sawn white oak)
- Veneer match — book, slip, plank, or random — specified and correct
- Grain direction is called out, especially where horizontal and vertical runs meet
- Edge banding type and thickness match the face material
- Substrate appropriate for the finish (MDF for paint, veneer-core ply for stain)
- Finish callouts reference the project finish schedule, not "match approved sample"
- Solid surface, stone, or metal accents spec'd correctly with seam locations shown
Pass 3: Hardware
- Hinge type, opening angle, and soft-close behavior confirmed
- Drawer slides — undermount vs side-mount, weight rating, full vs three-quarter extension, soft-close
- Pulls and knobs — manufacturer, finish, CC dimension, orientation on doors and drawers
- Shelf supports — type, quantity, locations
- Locks, push latches, and electrified hardware addressed
- Hardware schedule cross-referenced on every page that uses it
Pass 4: Construction Details
- Joinery appropriate to application (dadoes for shelves, dovetails for drawers, etc.)
- Back panel material and thickness called out
- Fixed versus adjustable shelving correct
- Filler and scribe allowances present
- Crown, base, and trim moldings detailed
- Field joints and seam locations make sense given material sizes and access through the building
Pass 5: Trade Coordination
This is the pass that saves jobs. Walk every sheet looking for the interface between the millwork and another trade:
- Electrical — outlets, switches, junction boxes, low-voltage drops, GFCI requirements, LED drivers and their service locations
- Plumbing — rough-in heights, valve access, water supply and waste locations relative to base cabinet interiors
- HVAC — register cutouts, return air pathways, equipment access
- Lighting — under-cabinet, in-cabinet, toe-kick, in-mirror, integrated LED strips
- Appliance — clearances, panel-ready specs, ventilation, gas vs electric
Each interface should either be coordinated and called out on the drawing or flagged as needing coordination. Silence is not an acceptable answer for a known interface.
Pass 6: Package Integrity
- Every page on the same revision date
- Cross-references between plan, elevation, and section accurate
- Schedules (finish, hardware, materials) internally consistent
- Scope matches the contract — no scope creep and no gaps
Use Lettered General Notes for Conditions That Apply Across Sheets
Numbered callouts handle local stuff: this dimension wrong, this hinge missing, add this detail. Lettered general notes handle conditions that span the whole package.
Set a few standing notes at the bottom of the first sheet, then cross-reference them everywhere they apply:
Now on every sheet where the condition shows up, you just write SEE NOTE 'B' with a leader pointing to the joint. The fabricator doesn't have to read three pages to figure out whether the condition applies. The note is binding on Sheet 1, and any sheet that doesn't reference it implicitly doesn't have that condition.
This pattern catches a problem that numbered-only systems can't: the global note that gets called out on Sheet 1, missed on Sheet 3, and ends up only half-implemented in the shop.
Categorize Every Comment
Most redline systems have a category for this is wrong and a category for I have a question. The complete system has more:
- CHANGE — correction to something that's drawn (wrong dimension, wrong material, wrong hardware)
- QUESTION — clarification needed, may or may not become a change
- INFO — for the fabricator's awareness, no action required
- ADD — drawing or detail missing from the package entirely
- VIF — verify against field condition
The CHANGE-vs-ADD distinction matters because it changes the disposition logic. If five comments are corrections, the resubmittal is a revision. If five comments are missing drawings — no north elevation, no cased opening detail, no section through the LED bulkhead — the resubmittal is functionally a re-issue. The fabricator's lead-time clock effectively resets. Procurement needs to know.
Mark scope-add callouts with their own verb to keep them visible: "PROVIDE ELEVATION — NORTH," "INCLUDE CASED OPENING DETAIL & WIDTH," "MISSING RECESSED LED STRIP."
How to Actually Mark Up the Page
A redline is a drawing, not a paragraph. The fabricator should be able to see what changed at a glance.
Cloud every change. A revision cloud around the area being modified is the universal sign that something on this page is different from the original. Without a cloud, the fabricator has to read every word of every callout to find what needs attention.
Number every comment. Sequential numbers across the package, not restarted per sheet. This makes the comment list at the back work as a real index.
State the new value, not just the problem. "Revise to 9'-5-1/4" with 1/2" scribe each end" — not "wrong" or "fix this." The fabricator should be able to build from your markup without picking up the phone.
Reference the source. Every change should point to where the requirement comes from: an architectural detail number, a spec section, an RFI, a sample. "Revise per A-501 Detail 3" carries more authority than "revise."
Sketch the detail you want instead of flagging the gap. When a drawing is missing a detail — an edge profile, a reveal condition, a joinery callout — the lazy redline says "missing detail, add." The smart redline gives the fabricator the geometry. Sketch the profile right on the page. Step-down dimensions written in. Easing radius called out. Material noted. The fabricator now has everything they need to draw the detail correctly on the resubmittal, and you've just saved a full resubmittal cycle.
The rule of thumb: if the change you want is geometric, draw it. If the change you want is verbal — specify, confirm, coordinate — write it.
Initial and date every page. Even if nothing on that page needed marking, your initials in the corner say "I reviewed this." Without that, you can't tell what was reviewed and approved versus what was skipped.
Apply the Disposition Visibly
Most resubmittal protocols use a formal approval stamp in or near the title block. That works, but it gets buried. A faster convention — and the one we default to — is a single line written by hand across the top of each marked-up sheet:
That's it. Reviewer's initials, disposition, and the date the resubmittal is expected back. Three pieces of information the fabricator absolutely has to see, in the position their eye lands first when they pick up the page.
Use the same four phrases every time so they read as a stamp, not a note:
- APPROVED — proceed with fabrication
- APPROVED AS NOTED — proceed, incorporate the comments, no resubmittal needed
- REVISE & RESUBMIT — incorporate the comments, send back for re-review before fabricating
- REJECTED — the package is not workable as-is, restart
A formal rubber-stamped disposition still has its place on the cover sheet or transmittal, but the per-sheet handwritten line keeps everyone honest. If a sheet doesn't have it, you forgot to review the sheet.
When the disposition is REVISE & RESUBMIT, state the turnaround expectation explicitly — "resubmit within 5 business days" — and copy procurement on items that affect lead time.
Common Mistakes That Burn Projects
Reviewing only what's changed. When a fabricator resubmits, the temptation is to look only at the items you flagged previously. Resist it. Changes ripple, and a corrected hinge often comes with a quietly redrawn shelf layout the fabricator never called out. Re-run the full review on every resubmittal.
Verbal corrections without paper trail. "I told them on the phone to use Blum hinges" is not in the contract documents. If it's not on a marked-up drawing or in a written RFI response, it didn't happen.
Ambiguous markup. A circle around a dimension with no annotation. The fabricator now has to guess whether you're approving the dimension, questioning it, or asking for a change. Always pair every mark with a written instruction.